
Advanced JavaScript - Part 1
- Duong Hoang
- Jun 26, 2024
- 7 min read

Updated: Jun 28, 2024
There is a saying: There are only two types of things in this world: things that many people criticize and things that no one bothers to use. JavaScript is a prime example; it has some interesting features but also causes us headaches. The theory is easy to understand, but when it comes to practice, it’s a whole different story. So, I will go through each specific example with you and analyze it to understand JavaScript better.
This series might be quite long—I don’t know how many parts there will be. However, for those of you who haven't read my previous posts about JS, I will re-explain everything in this series. The theories in this series might also be repeated multiple times (depending on my mood) to help you grasp them better. Alright, let's dive in... LET'S GO 🚀
If you have any questions, don't hesitate to comment below. Or just leave a comment to greet me—that alone will give me more motivation to complete this series. Thank you very much. 🤗
With this code snippet:
function sayHi() { console.log(name); console.log(age); var name = "Lydia"; let age = 21;}sayHi();Let’s find out why that’s the case ❔
1.1. Variables in JavaScript and Hoisting
When you see the above code, you might wonder: "Why does it display undefined and ReferenceError even though we declared the variables name and age after the console.log statements?" To answer this, we need to understand an important concept in JavaScript: hoisting.
1.2. What is Hoisting?
In JavaScript, when we declare a variable using var, the compiler will automatically "move" the variable declaration to the top of the function or the global scope. This process is called hoisting.
For example, when we have:
function saySomething() { console.log(message); var message = "Hello, I am Tuan!";}In reality, the compiler "sees" the code as follows:
function saySomething() { var message; console.log(message); message = "Hello, I am Tuan!";}
1.3. The variable name and the undefined value Going back to the initial code, although we declared the variable name after the console.log(name) statement, due to hoisting, the name variable has been "moved to the top" and only initialized, not assigned a value yet. Therefore, when we access the name variable at that point, its value is undefined.
1.4. The variable age, let, and the "temporal dead zone" For the variable age, we used the let keyword to declare it. Although let and const also go through the hoisting process like var, they are not initialized immediately. Instead, there is a period during which they cannot be accessed—this is called the "temporal dead zone". If we try to access a let or const variable within this "dead zone", JavaScript will throw a ReferenceError.
In the example above, when we try to log the value of age before it is initialized, we hit the "temporal dead zone" and thus receive a ReferenceError.
1.5. The purpose of TDZ (Temporal Dead Zone) So why do we need the TDZ?
The main reason for using the TDZ is to help developers avoid subtle bugs and create a clearer context when using variables.
For example, consider the following code:
function updateUserProfile(id) { if (id) { let profile = getProfileById(id); } console.log(profile); // Throws ReferenceError: profile is not defined}updateUserProfile(1);As explained earlier, the compiler will "see" the code as follows:
function updateUserProfile(id) { let profile; if (id) { profile = getProfileById(id); } console.log(profile); // Throws ReferenceError: profile is not defined}updateUserProfile(1);Here, the TDZ helps us recognize that we are trying to use a variable before it is initialized. This helps avoid potential bugs, such as accessing a property of an uninitialized object.
The Temporal Dead Zone might sound complicated, but it is actually a useful feature that helps developers write clearer code and avoid bugs. Although not being able to access a variable within the TDZ can cause some difficulties in programming, it helps us avoid subtle bugs and enhances code clarity.
Some might say: "Nonsense, there’s no way I would use a variable before declaring it; even a first-year student knows that."
🤣 Believe me, if you are a true JavaScript developer, you will encounter this ReferenceError many times...
1.6. Illustrative Example To explain this more clearly, imagine you are at a BBQ party. When you arrive, you know the list of people who will attend (declared variables). Although you know their names, until they actually arrive (variables are assigned values), you don't know where they are (var variables will be undefined). And some other people, you only know they will come after a certain period of time (let variables in the "temporal dead zone").
Returning undefined is slightly different from putting it in the "temporal dead zone". For example, when you register for the BBQ with var, if you don’t arrive in time, the list will record undefined. And when recorded as undefined, it’s like asking a friend named undefined to reserve a spot for you until you arrive. Whereas those with let or const tickets are put on the "temporal dead zone" list, meaning they haven't shown up yet, and if the BBQ holds a giveaway event while you haven't arrived, you will miss out 🤣.
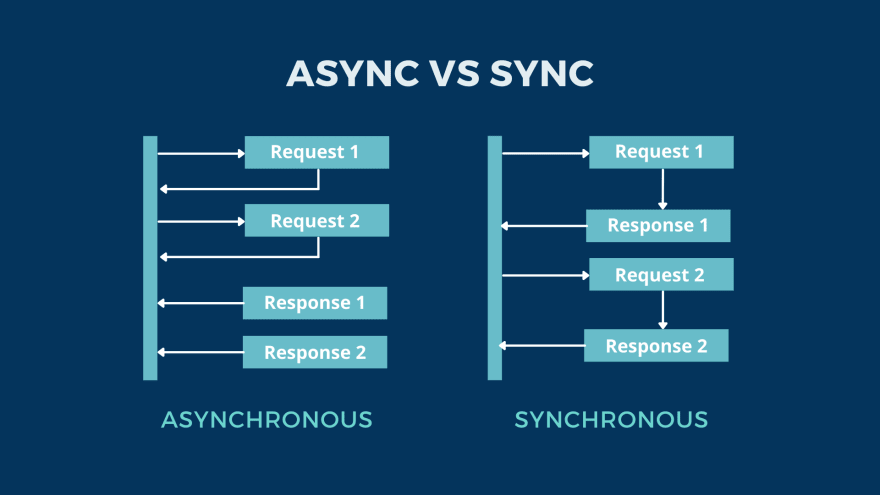
Before diving into examples, I want to talk a bit about Event Loop and Event Queue.
2.1. Event Loop In JavaScript, there is an important concept called the Event Loop. It is an infinite loop where the JavaScript engine continuously checks if there are any tasks to perform.
2.2. Event Queue When an asynchronous function like setTimeout is called, its callback is not executed immediately. Instead, it is placed in a queue called the Event Queue. Only when all tasks in the execution stack are completed does the Event Loop start taking tasks from the Event Queue and executing them.
2.3. Example 2.3.1. Loop with var When using var:
for (var i = 0; i < 3; i++) { setTimeout(() => console.log(i), 1);}The variable i is declared with var, so it has a global scope. Thus, from start to finish, there is only one i. When the loop ends, the value of i is 3. Recalling the Event Queue, the setTimeout function does not execute immediately but waits until all loops are completed. Therefore, when it executes, the value of i is 3, and we will see the output: 3 3 3.
2.3.2. Loop with let When using let:
for (let i = 0; i < 3; i++) { setTimeout(() => console.log(i), 1);}In each loop iteration, i is a new variable. This means that each setTimeout callback will "remember" the value of i at the time it was created. Therefore, when setTimeout is executed from the Event Queue, it will print the value of i at the time the callback was created: 0 1 2.
You can see the difference when using var and let in a loop combined with an asynchronous function like setTimeout. This shows the importance of understanding how JavaScript handles code and the significance of choosing the right keyword when declaring variables. 🔥
My experience is to always be careful when using var; only use it when you understand its scope well. In practice, most people now use let and const to avoid unnecessary bugs.
const shape = { radius: 10, diameter() { return this.radius * 2; }, perimeter: () => 2 * Math.PI * this.radius};console.log(shape.diameter()); // What will appear?console.log(shape.perimeter()); // And here?Why is the output: 20 and NaN instead of 20 and 62.83185307179586?
The peculiarity in the above code is due to using two types of functions: regular functions and arrow functions. The main difference between them is how they handle the this keyword.
3.1. Defining the shape object
const shape = { radius: 10, diameter() { return this.radius * 2; }, perimeter: () => 2 * Math.PI * this.radius};Here, shape is an object with three properties: radius, diameter, and perimeter.
radius is a property with a value of 10.
diameter is a regular method.
perimeter is an arrow function.
3.2. Understanding this in a regular method When you call a regular method, the value of this inside that method points to the object that called the method.
For example:
shape.diameter(); // Result is 20// this refers to shapeWhen calling shape.diameter(), this inside the diameter function points to the shape object and returns the value radius 2, which is 10 2 -> Result: 20.
3.3. Arrow Function and the mystery of this Back to our main issue
Unlike regular methods, arrow functions do not create a new this context. Instead, they capture the this value from the surrounding lexical context at the time they are defined.
In our case, the surrounding context is the global scope, where this refers to the global object.
So in the perimeter function, this.radius is undefined, leading to the result of 2 Math.PI undefined, which is NaN.
javascriptSao chép mã
shape.perimeter(); // Result is NaN // this refers to the global object
This result demonstrates the importance of understanding the this keyword and the difference between regular methods and arrow functions.
console.log(+true); // ?console.log(!"Lydia"); // ?The output will be: 1 and false.
Why is that? Let’s analyze ❔
4.1. Converting values with + When we use the + operator before a value, it tries to convert that value to a number.
So when we have:
+true;JavaScript converts true to 1, as 1 is the numeric representation of true.
4.2. Logical NOT (!) and truthy values When we use the logical NOT operator (!) before a value, it returns the opposite boolean value of that value.
So when we have:
!"Lydia";Lydia is a non-empty string, which is considered a truthy value in JavaScript. Therefore, the logical NOT operator converts it to false.
This demonstrates that the + and ! operators can change the type of a value and produce unexpected results if we don’t understand how they work.
const bird = { size: "small"};const mouse = { name: "Mickey", small: true};console.log(mouse[bird.size]); // Output: trueWhy is the output true?
5.1. Property Access with Dot Notation and Bracket Notation In JavaScript, we can access object properties using dot notation (.) or bracket notation ([]).
Dot notation is more convenient and readable but can only be used when the property name is a valid identifier (without spaces, punctuation, or starting with a number).
Bracket notation is more flexible. It can be used with any string, including strings with spaces or special characters.
In this example, we use bracket notation:
mouse[bird.size]; // "small" is the property name, which points to mouse.smallThe property bird.size is "small", and mouse.small is true. Therefore, the output is true.
This demonstrates the importance of understanding different ways to access object properties and how they can produce different results depending on how we use them.
JavaScript is a powerful and flexible language, but it also requires a deep understanding of its core concepts and unique features. Understanding hoisting, the Event Loop, arrow functions, and how JavaScript handles operations and objects will help you write efficient code and avoid common pitfalls.
Commenti